Hawthorn fly
CDC Caddis
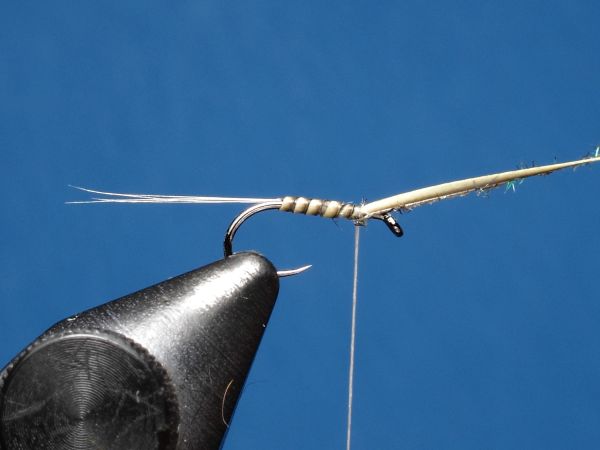
Caddis Pupa
Herl Bodied Grayling Fly
Large Dark Olive Mayfly
Peeping Caddis Fly
Olive Quill
Simple Black Buzzer
Scruffy Grayling Bug
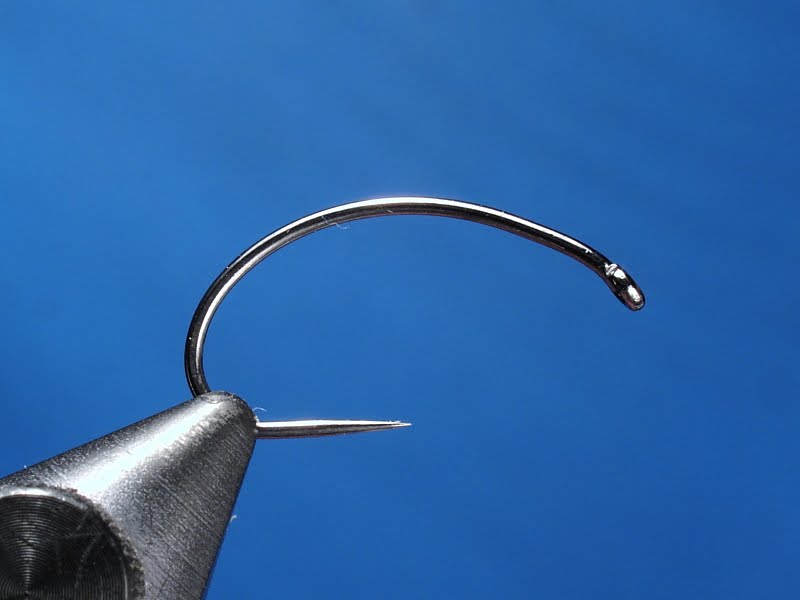
Czech Nymph in 10 easy steps
Step 1: Hook Selection
Select a scud hook of appropriate size. By appropriate I mean rather large - this one is size 8 and it is my favorite size for trout fishing. You will want your nymph to be both slim and heavy at the same time; that simply does not work in sizes 14 and upwards.
Add a layer of lead. Flat lead works the best; it packs more tightly than round lead and high density is crucial. In this example I went for one layer of lead, but you can add two for extra weight. In such case make the second layer one turn shorter on each side to preserve the tapered look. Make sure the lead does not extend past the hook bend - you want to leave a plenty of space to tie in the ribbing and back cover. Otherwise your nymph will have a fat ass, which is a major NO, NO!
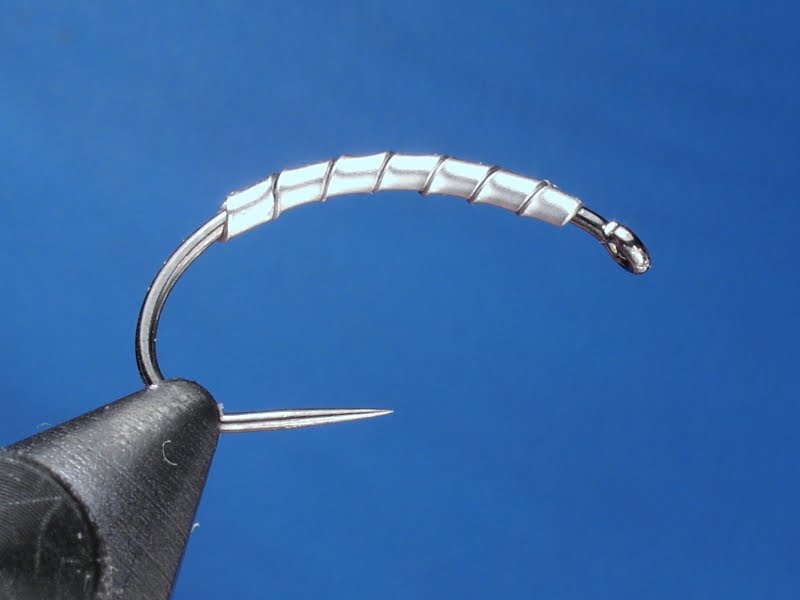
Tie in your thread and tightly lash the weight to the hook. I have selected UNI 6/0 thread in color tan. The 6/0 thread is stronger than 8/0 I use for most of my other tying and can stand some abuse - it will receive a lot! I want my lead packed ever more tightly, high density is very important for a CZ nymph. I selected color tan so that it will not darken the dubbing as black thread would.

Now make use of the empty space you left in the hook bend and tie in first the ribbing - I am using 0.16 mm monofilament spinning line here - and then back cover. For back cover I am using 4 mm wide strip in honey color, so it will be just a shade darker than my dubbing. Lash both to the hook bend very tightly, keeping in mind that the fat ass you are trying very hard to avoid.

Step 5: Abdomen
Dub the abdomen - about one half of the nymph body, perhaps slightly more. I am using hare dubbing color light olive here, rabbit will work also fine. If using natural dubbing (which I strongly suggest) be aware that it will darken once wet and select the color accordingly. Again, keep in mind the fat ass you are trying very hard to avoid!
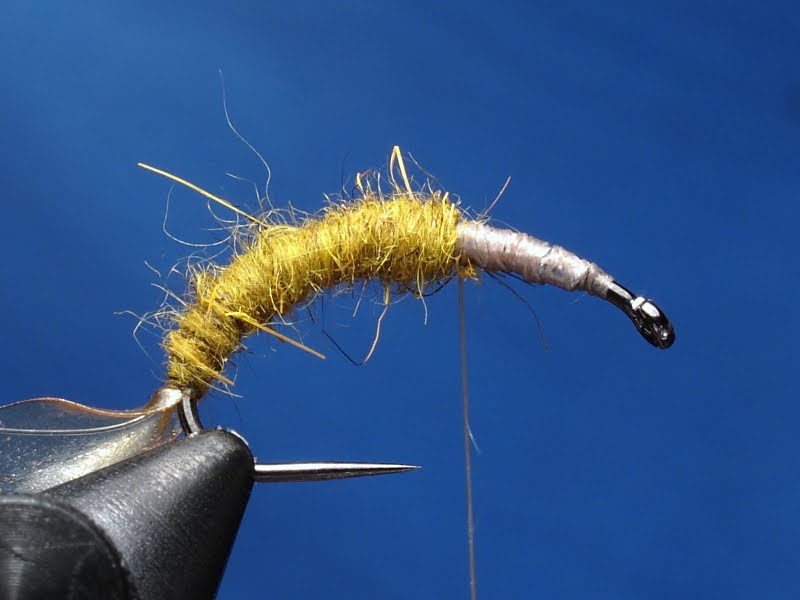
Step 6: Hot Spot
Dub the hot spot (optional). Use bright red, orange or hot pink colors. Here I am using Seal fur colored hot orange. The hot spot is optional - when fishing it can make your day or scare the fish witless for no apparent reason.

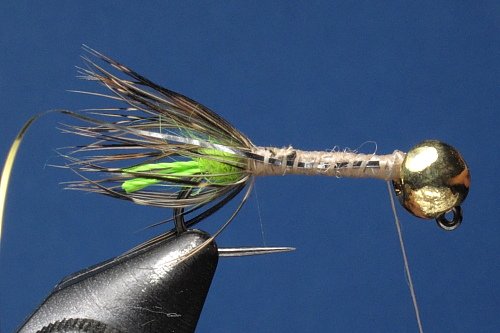
Step 7: Thorax/Legs
Dub the front part of the fly. Use scruffy dubbing with longish hairs, so it will add movement to your fly. I am using black hare mixed with black seal. Leave just enough space for the head.

Step 8: Fold Over the Back Cover
This is the tricky part. Fold over the back cover, stretching it slightly forward so that it covers the body snugly. Tie in with your tying thread and secure tightly. Whip finish - and only then cut the redundant part off. Few things are more frustrating than having the fly come apart at this stage due to sloppy tying of the back cover. Trust me. I had it happen many times, and you would not wish to hear what I had to say about it.

Step 9: Wrap the ribbing
Now that the tricky part is done you wrap your ribbing. Make sure you wrap in the direction of your tying thread, mono is slippery and you want your fly to look neat.

Step 10: Finishing touches
You are almost done. The only finishing touches left are brushing your fly vigorously with a velcro strip and coloring your head and front half of the back cover with black marker.
Take a step back and enjoy!

top of the page
Hawthorn Fly in 10 easy steps
Step 1: Hook Selection
Select a lightweight curved shank hook in appropriate size; here I am using Tiemco 2487BL in size 12. Size 14 can be also considered, but in my experience fish respond well to slightly oversized imitations.

Step 2: Thread
The obvious choice is black UNI 8/0 thread. Cover the whole hook thoroughly.

Step 3: Body material
For body I am using pheasant tail dyed black. It has nice structure and very little bulk. Attach it in the thorax area, in order to avoid any unseemly bumps disturbing the sleek silhouette of the abdomen.

Step 4: Build the body
Cover the pheasant tail fibres with your tying thread down to the hook bend, wind your thread back to the thorax area and wind the PT fibres back, securing them tightly.
You can also (optionally) rib the abdomen to add greater durability; a neat trick is using the leftover part of the tying thread to do so (the part you would normally cut off when initially tying in the thread).

Step 5: Attach the legs
The legs are very pronounced part of the Hawthorn fly. I am using two knotted fibres of Pheasant tail dyed black (same as the body). The choice of one or two fibres for each leg is entirely optional, I like two for more durable and pronounced legs.

Step 6: Cut the legs to size and create thorax
Cut the legs so that they will be a bit longer than the hook shank. The long legs are an important trigger point of the Hawthorn fly, you can even exaggerate a bit compared to the natural.
Dub the thorax area with a fine black dubbing. I am using muskrat, but any dry fly dubbing will do. Make sure the thorax is short but rather thick - it will hold the wings spread apart.

Step 7: Attach the wing
I am using Tiemco Aero Dry Wing, but any white or dun polypro yarn will do. Tie the wing as close to the thorax as possible, leaving still room for hackle and head.

Step 8: Attach the hackle feather
I am using low quality black rooster hackle. The ADW wing will help with flotation, so there is no need for the best quality hackle. On the contrary, webby hackle will add movement to the fly.

Step 9: Wind the hackle
Make several turns of the hackle, whip finish. No need to make too many turns of the hackle, the Hawthorn fishes the best when sunk just inside the film.

Step 10: Finishing touches
Form a neat head, add tying lacquer if desired. Cut the ADW wing to shape.
Take a step back and enjoy!

top of the page
CDC Caddis in 10 easy steps
Step 1: Hook & Thread selection
Use your favorite dry fly hook in appropriate size and your favorite thread of a drab color. I am using Hanák 130BL hook in size 12 and UNI 8/0 thread color tan.

Step 2: Tag and Ribbing
Add a tag of your favorite color - I am using hot Green UNI neon thread; red, orange or claret tags are also to be considered. For ribbing I am using UNI #16 tinsel. It has one side gold, other silver and it is tied with the silver side upwards, so that the golden will show once it is wrapped around.

Step 3: The body
Create a body of lightly dubbed (i.e. scruffy) dubbing of Hare; wrap the tinsel (rotary vice helps).

Step 4: The wing
Add a wing made of 3 CDC feathers of medium size. The tips should be just a tad longer than the butt of the fly. Clip the butts and secure the thorax area.

Step 5: Prepare CDC feathers for hackling
This is the tricky part: Select 2 largish CDC feathers and a tool for folding them over. This can be done using many different tools of varying price and complexity; I am using a very simple block of Styrofoam with a couple slits.

Step 6: Fold the CDC feathers over
Using your tool of choice fold the CDC feathers over and pull them forward by the tips, straightening the fibres.

Step 7: Catch the hackles in pincer
Using a tool of your choice - I am using a paper clip, but the Petijean Magic Tool is a workable substitute - catch the CDC fibres sticking out and cut off the stem.

Step 8: Dubbing loop
Prepare a tight dubbing loop with your dubbing twister; make sure it is not loose around the fly. Pass the CDC fibres from your tool to the dubbing loop. Try to avoid any wax, as it is likely to spoil the structure of CDC feathers.

Step 9: Twist the CDC fibres into brush
Spin your dubbing twister vigorously, creating a dubbing brush. Wind the brush around thorax area of your fly using a pair of hackle pliers.

Step 10: Finish the fly
Tie off the dubbing brush, form a neat head. Do attempt to shorten the hackle fibres, as their high mobility in even the smallest current is a major trigger point for this fly.
Take a step back and enjoy your work

top of the page
Caddis Pupa in 10 easy steps
Step 1: The Hook
I am using Skalka Pupa hook in #12, but any pupa (lighty curved) hook will do. Size 12 seems to fit most closely the Caddises in my neigbourhood, but as there are myriads Caddis species around it may be necessary to adjust by moving up or down in size.

Step 2: Thread & Weight
Using weight on your pupa flies is controversial topic, with some tiers strongly against. I go the middle ground, with just about two turns of flat lead by the hook bend. The little weight will help the fly to break through the surface film and attain the proper "rising" position heads up, bottom down. For thread I am using 8/0 UNI in color Tan.

Step 3: Abdomen Cover & Ribbing
Caddis pupae have distinct dark stripe on top of their abdomen. I consider it to be an important feature of the natural and imitate it with a slip of motley Turkey feather ribbed with yellowish thread. I believe it to be more pleasing to the eye of tyer to attach the ribbing to bottom of the fly, so the ribbing starts from bottom. The fish don't seem to care.

Step 4: The abdomen
Trim the Turkey feather slip and dub abdomen in color of your local Caddis flies. I am using a mix of Golden Olive Hare dubbing and Hot Green SLF. Apple Green, Tan and even Rusty Orange are also valid dubbing colors.

Step 5: The Dark Stripe
Fold over the Turkey slip to acheive the distinct dark stripe on top of the fly.

Step 6: The Rib
Trim the excess Turkey. Wind the ribbing thread in about 5 even turns, securing the Turkey in place.

Step 7: Wing buds
The wing buds are optional, but I believe they improve the look of a pupa. I am using Pheasant primaries, lightly imbued with a flexament.

Step 9: Antennae
I like my Caddis Pupae to sport some good sized antennae made of Badger hair. Not all Caddises have them as pronounced as my imitation, so you have to adjust to your local conditions.

Step 10: Finish
Trim the waste ends of Badger hairs and dub some more Hare to finish off the head. Tie off your thread, covering the knot in dubbing.
Take a step back and enjoy your work!

top of the page
Herl Bodied Grayling fly in 7 easy steps
Step 1: The Hook
The best size of late season Grayling dries is either 18 or 20. Due to limitations of my Macro setup I am using #18 to get the best picture quality. The hook is Hanák 130 BL

Step 2: The Thread
Only the finest thread should be used for flies this size; I am using UNI Trico 17/0 unwaxed thread colored white.

Step 3: The Flash
To make the correct choice a bit easier for Mr. Grayling I am adding a little flash to the fly. It may imitate the trailing shuck, or just arouse curiosity of the fish, but it helps me to have confidence in my fly. I am using 3 strands of orange Krystal Flash.

Step 4: The Herl
Many different herls can be used - Heron, Olive dyed Goose, Eagle Owl (the best, but sadly outlawed by CITES) and Ostrich. I am using natural gray Ostrich. The Ostrich herl is sturdy and Grayling are not known for their toothy mouths, but just in case a brownie decides to show up and tear my fly up I am using two strands of the herl. If I were targeting my fly specifically to brown trout I would be including a counter rib of gray 6/0 thread (and making the fly a size or two bigger).

Step 5: The body
Trim the flash and wrap the herl in the direction of tying thread forward almost but not all the way up to the eye.

Step 6: The wing
Trim the butt end of the herl, add 3 CDC puffs to form the wing.

Step 7: Finish
Trim the CDC feathers, form a small head & whip finish.
Take a step back and enjoy your work :)

top of the page
Large Dark Olive Mayfly in 10 easy steps
Step 1: The Hook & Thread
The hook is size 14 Hanák 130BL hook, but any lightweight dry fly hook will do. For thread I am using gray Sheer 14/0. A fine diameter thread is important, a heavy thread would add too much bulk when spinning the CDC. Thread in greyish color will not alter the color of the dubbing, as a dark thread would.

Step 2: The tails
Attach a bunch of Coq de León fibers. Make one turn of the thread under the tails, setting them off a bit and spreading them out. I like the body of my mayflies to start at the level of barb (or at the point where the barb would be if there was one). I like tails on my dun imitations about the same length as the body.

Step 3: The body
Trim the waste end of the Coq de León and build a nicely tapered body. I am using olive dyed rabbit hair.

Step 4: CDC - 1
There are several techniques for creating a CDC dubbing brush. I am using a small block of Styrofoam with slits. Select 2 medium size CDC feathers with longish barbs.

Step 5: CDC - 2
Fold the CDC feathers in a slit in the Styrofoam block. Pull the tip part a little forward, so the barbs stick out in right angle.

Step 6: CDC - 3
Capture the CDC barbs in a paperclip and cut the stem out.

Step 7: The dubbing loop
Prepare a dubbing loop, use the paperclip to transfer the CDC to the loop.

Step 8: Dubbing brush
Spin your dubbing loop tool vigorously, creating a dense dubbing brush from the CDC fibers.

Step 9: Wind the brush
Replace your loop tool with a pair of hackle pliers and wind the dubbing brush around the thorax of your fly. Secure the brush with your tying thread and form a neat head.

Step 10: Finishing touches
Tease the CDC fibers back with your left hand and cut them to shape.
Take a step back and enjoy your work :)

top of the page
Peeping Caddis Fly in 8 easy steps
Step 1: The hook
For a fly of this weight and size a jig hook is better choice, as it will snag a bit less. Just keep in mind you are going to lose your fly, and have some spare.

Step 2: Bead and Lead
I am using some seriously heavy metal - 4.6 mm Tungsten bead and a layer of flat lead.

Step 3: Tip
For the tip I am using 4 strands of UNI Neon thread, color Fluo Green. It will imitate the peeping caddis larva and - more importantly - act as an attractor.

Step 4: A touch of dubbing
To make the tip more pronounced I add a small ball of hot green dubbing; it will make the tip more pronounced.

Step 5: Hackle
A smallish partridge feather to imitate legs of the caddis larva and add movement to the fly.

Step 6: Finish the hackle
Wind the hackle, attach a thin gold tinsel.
Step 7: Body
Dub body of scruffy dubbing from back of a hare.

Step 8: Finishing touches
Counter rib the body and whip finish. Brush the fly vigorously with a velcro strip.
Take a step back and enjoy your work :)

top of the page
Olive Quill in 10 easy steps
Step 1: The hook
This will be a grayling fly, so #18 size is the most appropriate. I am using Hanák H130 BL but any other make will do.

Step 2: Attach the tails
For tying flies use the finest thread in a neutral color. I am using Sheer 14/0 thread in color gray. The tails are cream colored rooster hackle of rather inferior quality. Proportions are important, make sure the tails are about the length of your fly body.

Step 3: Trim the tail
Trim the tail and use your thread to make a slight taper to the body. Make the last turn of your thread just under the tails, so that they spread a little and turn upward.

Step 4: The quill
Attach the peacock quill. For this fly I am using a quill dyed olive, but an ordinary undyed quill will also do. Usually on one side of the quill is the dark stripe more pronounced than on the other. Tie in this more contrasting side facing downward - so that it will be facing upward on the finished fly.

Step 5: Trim the quill
Trim the quill and finish the tapered look of your fly. Add a drop of tying lacquer to the body to improve its durability (it will be pretty fragile still, but grayling are not known for their chewy teeth).

Using a pair of hackle pliers wind the quill in direction of your tying thread and secure it with a few wraps of your thread.
Step 7: CDC wing
Trim the waste end of the peacock quill. Attach the wing of 2 or 3 fine CDC feathers. Again, proportions are very important. Make the wing just a tiny bit longer than the hook shank.

Step 8: Trim the CDC
Trim the butt ends of the CDC feathers and make a rough dubbing rope of hare's fur. Be sure that it contains a lot of guard hairs - it will make for a fuzzy impression and improve flotation.

Step 9: The thorax
Wind the rough dubbing to make thorax. Make two or three wraps behind the wing and just one in front of it. This way you will ensure your imitation has its wing cocked up in a sharp angle - just like the natural insects.

Step 10: Finishing touches
Complete the thorax and finish your fly with a neat little head. Tease out a few guard hairs from the thorax to give it a more scruffy look.
Take a step back and enjoy your work!

top of the page
Simple Black Buzzer in 10 easy steps
Step 1: The hook
I am using a heavy wire curved shank hook, in this case Kamasan B110 Grubber hook. Its heavy wire will lend the buzzer a high density with a slim profile. As I don't practice Catch & Release on stillwaters I leave the barb in place.

Step 2: The Body Thread and the Ribbing
For the body I am using UNI stretch, color Black. The rib is Gütermann Sulky mylar tinsel from an embroidery shop. Be sure to start the thread in the future throax area - the extra bulk will not be noticed here.

Step 3:The Body
Build the body by wrapping the UNI Stretch thread to the hook bend and back to the thorax area. Whip finish, and tie in the UNI 6/0 thread, again making sure any knots will be hidden by thorax.

Step 4:The Ribbing
Wrap the ribbing, tie it of in the area of future thorax. The last turn or so need not be too tidy, as it will be covered by thorax anyhow.

Step 5: Tie in the Cheeks
For the cheeks I am using UNI Peacock/Orange mylar. The orange side will be showing on the finished fly, so I tie it in with the peacock side up. I tie it at belly side of the fly.

Step 6: Fold the Mylar
Now I fold the Mylar tinsel, so that both ends are facing to the tail of the fly, still showing the peacock side. I proceed to build up the thorax of the fly, taking care to leave enough space for a neat head.

Step 7: Fold the Mylar for the Second Time
Finally I fold the Mylar over, creating the cheek. The Mylar runs diagonally over the thorax. In order to handle the slippery Mylar more easily I secure the cheeks one at at time.

Step 8: Create the second Cheek
Fold the second piece of mylar over, creating the second cheek. Notice how both pieces of mylar are fastened diagonally, forming a sort of letter X.

Step 9: Almost ready...
Clip off the mylar, form a neat head.

Step 10: Finishing touches
Cover the buzzer with a layer of lacquer / resin of your choice and let it dry. Take a step back, enjoying your work.

top of the page
Scruffy Grayling Bug in 9 easy steps
Step 1: Hook Selection
For Grayling fishing I prefer smaller hooks than for Trout. This will be a nymph, so a more substantial hook is called for. The Kamasan B110 Grubber hook (debarbed) is a nice compromise.
To add some weight a 3.3mm caliber Tungsten beadhead is attached.

Step 2: Start the Tag
The tag is from Glo Brite floss. Grayling like pink color, so I am using the pink #2 color. Others - such as #12 fluo green - are also very good.
The tag is tied on the bare hook, without the help of regular tying thread.

Step 3: Finish the Tag
Finish the tag, whip finish and cut off your floss.

Step 4: Tying Thread
Tie in your regular tying thread. I am using an elastic tan thread.

Step 5: Ribbing material
Tie in a length of golden French tinsel, making sure the tinsel starts just behind the bead. This way the fly will have uniform thickness, without any unseemly humps.

Step 6: Dub the body
Dub the body using coarse hare hair. Leave a little space behind the head to tie off the ribbing.

Step 7: Wrap the Ribbing
Wrap the ribbing, making about 3 even turns. Secure the ribbing with your tying thread and cut it off.

Step 8: Dub the Thorax
Cover the space where the tinsel has been tied off with loosely dubbed Hare. Use a little bit more material than would seem fit. Whip finish your tying thread into the dubbing.

Step 9: Finishing touches
Using a piece of velcro strip rub the whole fly (and especially the loosely dubbed thorax) vigorously. This should give the fly an unkempt, scruffy look.
Take a step back and enjoy your work!

top of the page